Schematic | Circuit guide | Manual Wiring diagram | Electronic
Showing posts with label flasher. Show all posts

LED Flasher circuit Diagram

Posted by Unknown Tuesday, May 28, 2013 0 comments
This is Multi vibrator circuit diagram H ere you can attach up to 4 LEDs.I suppose this circuit will be so useful for all.You can use this circuit to decorate your Wesak Lanterns


Note
# This circuit can be operated with 3 to 9V

Car Reversing Horn with Flasher

Posted by Unknown Friday, April 12, 2013 0 comments
Here is a simple circuit that starts playing the car horn whenever your car is in reverse gear. The circuit (refer Fig. 1) employs dual timer NE556 to generate the sound. One of the timers is wired as an astable multivibrator to generate the tone and the other is wired as a monostable multivibrator.

Circuit diagram :
 Simple Car-Reversing Horn with Flasher- Circuit Daigram

Fig. 1: Car reverse horn Circuit Diagram

Working of the circuit is simple. When the car is in reverse gear, reverse-gear switch S1 of the car gets shorted and the monostable timer triggers to give a high output. As a result, the junction of diodes D1 and D2 goes high for a few seconds depending on the time period developed through resistor R4 and capacitor C4. At this point, the astable multivibrator is enabled to start oscillating. The output of the astable multivibrator is fed to the speaker through capacitor C6. The speaker, in turn, produces sound until the output of the monostable is high.

When the junction of diodes D1 and D2 is low, the astable multivibrator is disabled to stop oscillating. The output of the astable multivibrator is fed to the speaker through capacitor C6. The speaker, in turn, does not produce sound.

Assemble the circuit on a general-purpose PCB and enclose in a suitable cabinet. Connect the circuit to the car reverse switch through two wires such that S1 shorts when the car gear is reversed and is open otherwise. To power the circuit, use the car battery.

The flasher circuit (shown in Fig. 2) is built around timer NE555, which is wired as an astable multivibrator that outputs square wave at its pin 3. A 10W auto bulb is used for flasher. The flashing rate of the bulb is decided by preset VR1.

Flasher-circuit diagram

Fig. 2: Flasher Circuit Diagram

Assemble the circuit on a general-purpose PCB and enclose in a suitable cabinet. The flasher bulb can be mounted at the cars rear side in a reflector or a narrow painted suitable enclosure.

EFY note. A higher-wattage bulb may reduce the intensity of the headlight. You can enclose both the car-reversing horn and flasher circuits together or separately in a cabinet in your car.

Source :  http://www.ecircuitslab.com/2011/06/car-reversing-horn-with-flasher.html

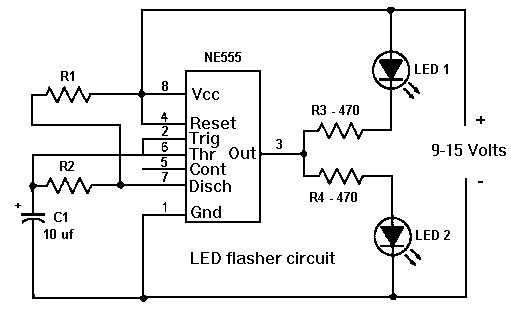
Simple LED flasher circuit using NE555 timer IC

Posted by Unknown Friday, April 5, 2013 0 comments
This circuit consumes more power, but its advantage is when you need a variable flash rate, like for strobe circuits. You can actually use this circuit as a remote control for strobes that have a remote input. Of course, it has many other applications besides strobes.

Simple LED flasher circuit using NE555 timer ICLED flasher circuit
  • R1, R2, C1 and the supply voltage determine the flash rate. Using a regulated power supply will do much to insure a stable flash rate. For a variable flash rate, replace R1 with a 1 megohm pot in series with a 22k resistor.
  • The duty cycle of the circuit (the percentage of the time LED 1 is on to the time it is off during each cycle) is deterimed by the ratio of R1 to R2. If the value of R1 is low in relationship to R2, the duty cycle will be near 50 percent. If you use both LEDs, you will probably want a 50 percent duty cycle. On the other hand, if R2 is low compared to R1, the duty cycle will be less than 50 percent. This is useful to conserve battery life, or to produce a strobe type effect, when only LED1 is used.
  • The NE555 timer chip can be damaged by reverse polarity voltage being applied to it. You can make the circuit goof proof by placing a diode in series with one of the supply leads.
  • The purpose of R3 and R4 is to limit current through the LEDs to the maximum they can handle (usually 20 milliamps). You should select the value of these according to the supply voltage. 470 ohms works well with a supply voltage of 9-12 volts. You will need to reduce the value for lower supply voltages.
  • Rainbow Kits offers several kits to build the above circuit. You can also order these kits from RadioShack.com. The Radio Shack catalog numbers (and web pages) are as follows: standard kit with two 5mm red LEDs, (990-0067), kit with two red, two green and two yellow 3mm LEDs, (990-0063), kit with jumbo green LEDs, (990-0048), kit with jumbo red LEDs, (990-0049). You can also buy all the parts to build the circuit at your local Radio Shack store, including a circuit board (276-159B).
I have built a miniature strobe circuit as follows. Use a 250k pot in series with a 4.7k resistor for R1. The 4.7k resistor sets the upper flash rate limit. Use 2.2k for R2. That sets a really short duty cycle. For this circuit, you dont use LED 2 or R4. For LED 1, I used a two Radio Shack white LEDs in series and no R-3. The circuit runs on a 9 v battery.  link